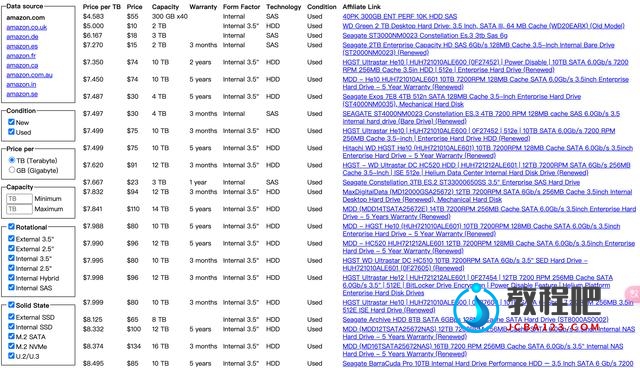
为你的opencart网站添加Buy on Amazon按钮 | 多站点跳转购买按钮 |Opencart教程
在在opencart搭建独立站跳转到亚马逊购买按钮流程开始:
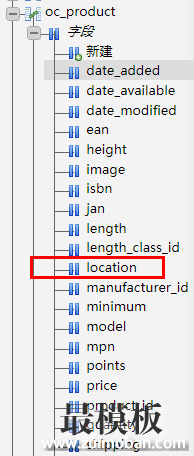
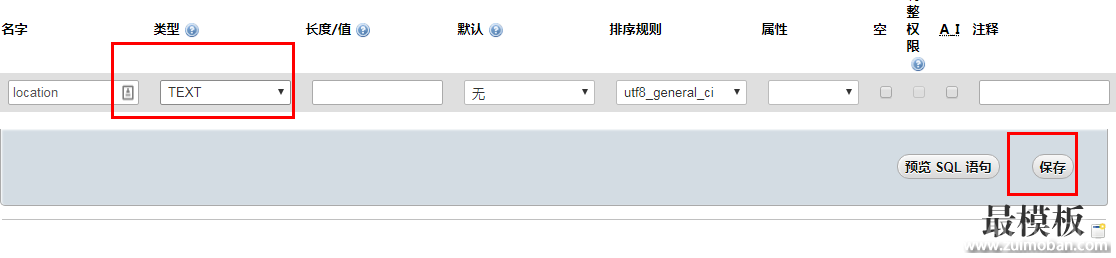
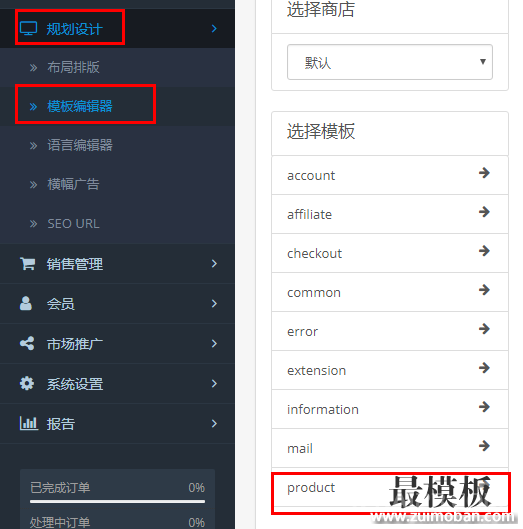
1.打开opencart后台–规划设计–模板编辑器–product
 2.输入以下代码
<style type=”text/css”>
.buy_button_thr { position: absolute; width: 185px; height: 42px;
line-height: 42px; display: inline-block; margin-left: 10px;
font-size: 14px; }
.buy_button_thr a { text-align: center; cursor: pointer; color: #fff; display: block; text-decoration: none; }
.buy_button_thr .buy_button_thr_a { border-radius: 50px; background: #f7ab00; }
.buy_button_thr .buy_button_thr_a:hover { background-color: #7f7f7f; }
.buy_button_thr .buy_button_thr_ul { list-style: none; margin: 0;
padding: 18px; background-color: #efefef; position:
absolute;width:100%;z-index:1; }
.buy_button_thr .hide { display: none; }
.buy_button_thr .buy_button_thr_ul li { display: block; padding:
4px 6px; font-weight: 400; line-height: 20px; margin-bottom: 4px; }
.buy_button_thr .buy_button_thr_ul li a { font-size: 12px;
text-align: left; cursor: pointer; color: #6d6d6d; display: block;
line-height: 100%; }
.buy_button_thr .buy_button_thr_ul li:hover a { color: #ec4a00; }
.buy_button_thr .buy_button_thr_ul img { vertical-align: middle; max-width: 100%; }
.buy_button_thr .buy_button_thr_ul li em { margin-left: 4px; }
#tab-description { line-height: 18px; padding-top:0;}
#tab-description > p { margin-bottom: 0; }
</style>
{% if HIDDEN_LINKS %}
<div id=”HIDDEN_LINKS” style=”display:none;”>{{ HIDDEN_LINKS }}</div>
{% endif %}
<script type=”text/javascript”>
$(function () {
({
jsonSelector: ‘#HIDDEN_LINKS’,
insertAfterSecltor: ‘#button-cart’,
countryIcon: {
uk: {
title: ‘United Kingdom’,
src: ‘/image/catalog/countryImgs/i_uk.jpg’
},
de: {
title: ‘Germany’,
src: ‘/image/catalog/countryImgs/i_de.jpg’
},
us: {
title: ‘United States’,
src: ‘/image/catalog/countryImgs/i_us.jpg’
},
jp: {
title: ‘Japan’,
src: ‘/image/catalog/countryImgs/i_jp.jpg’
},
it: {
title: ‘Italy’,
src: ‘/image/catalog/countryImgs/i_it.jpg’
},
es: {
title: ‘Spain’,
src :’/image/catalog/countryImgs/i_sp.jpg’
},
fr: {
title: ‘France’,
src: ‘/image/catalog/countryImgs/i_fr.jpg’
},
ca: {
title: ‘Canada’,
src: ‘/image/catalog/countryImgs/i_ca.jpg’
}
},
getLinks: function () {
try{
var $el = $(this.jsonSelector),
jsonStr = “”;
if ($el.length > 0) {
jsonStr = $el[0].tagName == “INPUT” ? $el.val() : $el.html();
}
return jsonStr.length > 0 ? JSON.parse(jsonStr) : ”;
}catch(e){
return ”;
}
},
createHtml: function (array) {
var i, len = array.length,temp,liStr=”,iconCfg;
for (i = 0; i < len; i++) {
temp = array[i];
iconCfg = this.countryIcon[temp.img] || temp.img;
liStr += ‘<li>
<a target=”_blank” href=”‘+ temp.link + ‘”>
< img data-width="194">
2.输入以下代码
<style type=”text/css”>
.buy_button_thr { position: absolute; width: 185px; height: 42px;
line-height: 42px; display: inline-block; margin-left: 10px;
font-size: 14px; }
.buy_button_thr a { text-align: center; cursor: pointer; color: #fff; display: block; text-decoration: none; }
.buy_button_thr .buy_button_thr_a { border-radius: 50px; background: #f7ab00; }
.buy_button_thr .buy_button_thr_a:hover { background-color: #7f7f7f; }
.buy_button_thr .buy_button_thr_ul { list-style: none; margin: 0;
padding: 18px; background-color: #efefef; position:
absolute;width:100%;z-index:1; }
.buy_button_thr .hide { display: none; }
.buy_button_thr .buy_button_thr_ul li { display: block; padding:
4px 6px; font-weight: 400; line-height: 20px; margin-bottom: 4px; }
.buy_button_thr .buy_button_thr_ul li a { font-size: 12px;
text-align: left; cursor: pointer; color: #6d6d6d; display: block;
line-height: 100%; }
.buy_button_thr .buy_button_thr_ul li:hover a { color: #ec4a00; }
.buy_button_thr .buy_button_thr_ul img { vertical-align: middle; max-width: 100%; }
.buy_button_thr .buy_button_thr_ul li em { margin-left: 4px; }
#tab-description { line-height: 18px; padding-top:0;}
#tab-description > p { margin-bottom: 0; }
</style>
{% if HIDDEN_LINKS %}
<div id=”HIDDEN_LINKS” style=”display:none;”>{{ HIDDEN_LINKS }}</div>
{% endif %}
<script type=”text/javascript”>
$(function () {
({
jsonSelector: ‘#HIDDEN_LINKS’,
insertAfterSecltor: ‘#button-cart’,
countryIcon: {
uk: {
title: ‘United Kingdom’,
src: ‘/image/catalog/countryImgs/i_uk.jpg’
},
de: {
title: ‘Germany’,
src: ‘/image/catalog/countryImgs/i_de.jpg’
},
us: {
title: ‘United States’,
src: ‘/image/catalog/countryImgs/i_us.jpg’
},
jp: {
title: ‘Japan’,
src: ‘/image/catalog/countryImgs/i_jp.jpg’
},
it: {
title: ‘Italy’,
src: ‘/image/catalog/countryImgs/i_it.jpg’
},
es: {
title: ‘Spain’,
src :’/image/catalog/countryImgs/i_sp.jpg’
},
fr: {
title: ‘France’,
src: ‘/image/catalog/countryImgs/i_fr.jpg’
},
ca: {
title: ‘Canada’,
src: ‘/image/catalog/countryImgs/i_ca.jpg’
}
},
getLinks: function () {
try{
var $el = $(this.jsonSelector),
jsonStr = “”;
if ($el.length > 0) {
jsonStr = $el[0].tagName == “INPUT” ? $el.val() : $el.html();
}
return jsonStr.length > 0 ? JSON.parse(jsonStr) : ”;
}catch(e){
return ”;
}
},
createHtml: function (array) {
var i, len = array.length,temp,liStr=”,iconCfg;
for (i = 0; i < len; i++) {
temp = array[i];
iconCfg = this.countryIcon[temp.img] || temp.img;
liStr += ‘<li>
<a target=”_blank” href=”‘+ temp.link + ‘”>
< img data-width="194">