更多有关条件格式的内容……
Another goal that we had for
conditional formatting was to address top customer requests, like more
than three conditions, the ability to reorder conditions, and the
ability to have more than one condition resolve true. Let’s take a look
at some of the more advanced conditional formatting UI and how it allows
us to address those customer requests (again, UI is not final). First,
let’s look at the “Conditional Formatting Rules Legend” dialog:
我们有关条件格式的另一个改进目标是满足用户的最主要的需求,比如多于三个条件、录制条件的能力、多重条件判断。让我们来看看更高级的条件格式界面以及它是如何满足那些用户的需求的。首先,让我们看看“条件格式规则图例”对话框:(译者注:在最新版本中,已经改为“管理规则”)
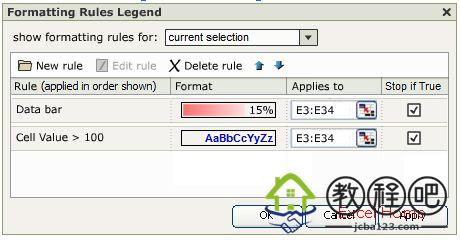
The Conditional Formatting Rules Legend
dialog is the one-stop place to view and manage all the conditional
formats in a workbook. Using this dialog, you can:
•View existing
rules – you can view the rule condition, the range it is applied to, and
the format set on the rule. The ‘Show Formatting Rules for’ dropdown at
the top of the dialog allows you to change the scope of the rules you
are looking at. You can view rules for the selected cells, the current
worksheet, the current Table, other worksheets in the book, other Tables
in the workbook, or the entire workbook.
•Add new rules via the New Rule button. More on this below.
•Change the order in which rules are evaluated. This is done using the up and down arrow buttons.
•Edit existing rules via the Edit Rule button. The Edit Rule UI is the same as the “New Rule” UI explained below.
•Delete rules via the Delete Rule button.
•Control whether more than one Rule can evaluate to true. More on this below.
这个对话框可以实现对工作簿中所有的条件格式进行一站式查看与管理,你可以:
•查看现有的规则——你可以查看规则包含的条件,应用的区域和目标格式。对话框上方的‘Show Formatting Rules
for’(显示规则范围)•下拉列表允许你选择查看不同范围中的规则。你可以选择查看应用于选定单元格的规则、当前工作表中的规则、当前列表中的规则、工作簿中其他工作表的规则、工作簿中其他列表的规则或者整人工作簿中的规则;?
•使用‘New Rule’(新建规则)按钮来添加规则;
•利用向上或向下的箭头按钮改变规则的优先级;?
•使用‘Edit Rule’(编辑规则)按钮来重新编辑现有的规则。新建规则和编辑规则的界面都将在下文中展示;
•使用‘Delete Rule’(删除规则)按钮来删除规则;
•控制是否会有多个条件为真的规则。
When you press New Rule on the
Conditional Formatting Rules Legend dialog, or when you select More
Options … from the conditional formatting gallery fly-outs, you will see
the “New Rule” dialog:
当你在上面这个对话框中选择新建条件,或者在条件格式的图形目录中选择“更多选项”时,你将看到“新建条件”对话框:
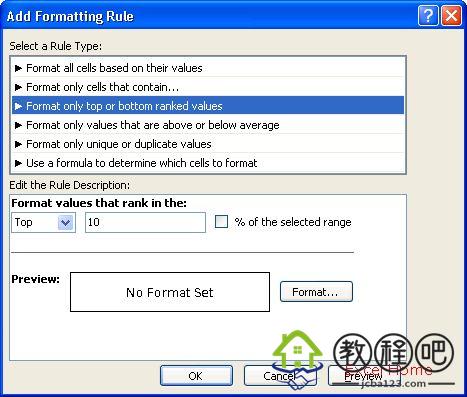
This dialog allows you to add new
conditional formats to the selected range. Through this UI, you can add
all the conditional formats that are available through the ribbon as
well as a set of additional, slightly more sophisticated conditional
formats. In addition, you can change the different settings and
parameters on any conditional format. We have broken down our
conditional formats into a few categories which are listed in the top of
the New Rule dialog under “Select a Rule Type”. The bottom part of the
dialog contains the Rule Description which changes based on the rule
type selected above. Here is a summary of the categories:
这个对话框允许你向选定的区域新建条件格式。通过这个界面,你可以像使用Ribbon时那样来创建所有可用的条件格式。事实上,你可以改变每种条件格式的设置与参数。我们已经把所有的条件格式分类并以列表方式显示在“新建规则”对话框中“选择条件类别”的下方,并且在对话框的下半部分根据选定的规则类别来显示不同的细节设置。下面简述这些规则分类:
•Format all cells based on their values – Use this to create a data bar, 2-color or 3-color color scale, or icon set rule.
•Format only cells that contain… – Use this to create the Excel
2003-style rules and more (format cells greater than, less than, greater
than or equal to, less than or equal to, equal to, not equal to,
between, not between). This is also the entry point to create rules of
type: specific text, date occurring, blanks, non-blanks, errors,
non-errors.
•Format only top or bottom ranked values – Use this to create top n, top n%, bottom n, bottom n% rule types.
•Format only values that are above or below average – Use this to
create above average, below average, 1 or 2 or 3 standard deviation
above, or 1 or 2 or 3 standard deviation below rule types.
•Format only unique or duplicate values – Use this to create rules that format unique or duplicate values.
•Use a formula to determine which cells to format – Use this to create
Excel 2003-style rules where you can enter a formula to determine
whether a format should be applied.
•Format all cells based on their values(根据单元格的值来格式化)– 创建data bar, 2色或3色的color scale,或者icon set
•Format only cells that contain…(单元格包含时格式化) – 创建 Excel
2003风格的规则或者更多(大于、小于、大于或等于、小于或等于、等于、不等于、界于…之间,不在…之间)。通过这里也可以创建这些类别的规则:指定的文本、日期,空白,非空白,包含错误,不包含错误。
•Format only top or bottom ranked values(按最高或最低排名格式化) – 创建top n, top n%, bottom n, bottom n% 的规则。
•Format only values that are above or below average (按高/低于平均值来格式化)
–根据单元格在区域中高于平均值,低于平均值,大于等于平均值,小于等于平均值,高1、2、3个标准偏差,低1、2、3个标准偏差来创建规则。
•Format only unique or duplicate values (根据唯一值或重复值来格式化)– 创建基于唯一值或重复值的规则。
•Use a formula to determine which cells to format (使用公式判断需要格式化的单元格)– 创建Excel 2003风格的,使用公式判断哪些单元格需要格式化。
Finally, as I touched on briefly in one
of my initial posts, we have also made some significant improvements in
the infrastructure of conditional formatting based on top customer
requests. We changed the following in Excel 12:
最后,正如我以前简要谈到过的,我们通过对条件格式的底层架构进行重大改进来满足最主要的用户需求。我们在Excel 12中做了以下改变:
•Number of conditions on a range is no
longer limited by number. In Excel 2003, you could create conditional
formatting rules with 3 conditions. Now, you are no longer limited by
number; you are only limited by system memory.
•Multiple conditions
evaluating to true. In Excel 2003, there could only be one conditional
format applied to a given cell. If more than one conditional format
evaluated to true, then only the format associated with the first
conditional format was applied. We now allow you to have multiple
conditional formats on a cell applied if more than one condition
evaluates to true. For example, assume you have one conditional format
that makes font style bold when true, and another that makes the cell
background colour red when true. If both conditions are true, you will
see both formats applied (bold text and red cell background color). When
the formatting is conflicting (for example red font and green font),
the first rule wins. This can be turned on or off for any rule using the
checkboxes on the Conditional Formatting Rules Legend dialog.
•References to other worksheets. In Excel 2003, you could not reference
ranges on other worksheets in a condition. Excel 12 allows cell
references anywhere in the workbook.
•Support for Number formatting
in conditional formatting. In Excel 12, the Number tab in the Format
Cells dialog will be available in conditional formatting so you can set
conditional formatting to be number formatting.
•同个区域的条件数量不再限制。在Excel 2003里面,你只能为条件格式的规则创建3个条件,现在你不再受此限制,你能创建的条件数量只受限的系统内存。
•多个为真的条件。在Excel
2003里面,只能有一个被足条件的对应格式应用到单元格里面,如果多个条件为真,只有第一个对应的格式被应用。我们现在允许你有多个满足条件的格式被应用。比如说,假设你有一个条件格式是当条件为真时设置字体加粗,而另一个条件为真是设置单元格的背景色为红色。如果两个条件同时为真,你可以看到两个格式都被应用到单元上去了(加粗字体和红色单元格背景)。当格式之间有冲突时(如红字和绿字),第一个条件对应的格式有效。这一项功能可以利用“Conditional
Formatting Rules Legend”对话框中用每条规则里的复选框来开启和关闭。
•引用其他工作表。在Excel 2003里面,你不能引用其他工作表的区域作为条件(译者注:可以使用名称来解决这个问题,但作者的本意是不能直接引用)。Excel 12允许引用工作簿中的任意一处。
•在条件格式中支持数字格式。在Excel 12里面,设置条件格式时,单元格格式对话框中的“数字”标签已经变为可用,所以你可以在条件格式中设置数字格式。
With that, we have largely summarized
our investment in conditional formatting for Excel 12. Next time, I will
briefly cover how this works in the object model, and then on to
formulas and functions.
至此,我们已经大量讨论了Excel 12中条件格式方面的改进。下一次,我会谈谈条件格式如何在对象模型中被操作以及公式与函数。
Published Thursday, October 13, 2005 12:04 AM by David Gainer